

One of the things I enjoyed the most in the White Dwarf issues of yore were the Battle Reports. I imagined the armies crossing the battlefield and I loved seeing a game unfold before my eyes. To me some of these battles became legends or part of military history as mush as Austerlitz, Trafalgar, Waterloo or Verdun.
12 years old me always dreamt about making his own Battle Report about our family games (do you want to know more?) and later about the 40k battles that raged in my parents living room. Lack of time, discipline and technological means prevented him to do so. As I owe him so much, here is my first try at that particular genre, since I have way more means to hobby than he ever dreamt we would. As it is my first try, do not expect something perfect, I just hope it is worth the read and hope you enjoy it. I can only promise you to make my best efforts to get better.
Inquisitor Bertrand was on his knees, facing the small window piercing the wall of his gloomy cell. He wore nothing but plain white robes and held his Judgement sword before him, weighing heavily on it. He whispered the holy words of the morning prayer to Mérin as the sun rose and then waited for the command of His God. After long minutes of silence, the God whispered in his ear, as He always did when Bertrand needed guidance. After blessing His God for the clarity of His bidding, Bertrand rose to his full height. He knew now that he had to secure the cemetery in the outskirt of the little town he had sworn to protect and purify, for dark forces were assembling…
Game / Scenario
Game: Confrontation v.3 (one day I’ll make a more comprehensive post about this wonderful game – maybe two, one about the lore, one about the rules -, all you have to know right now is that it is a skirmish game set in a fantasy universe that disappeared some years ago but may be ressurected soon).
Scenario: « conquest » (p.125 of the French edition of the Confrontation v.3 rulebook). Basically the objective is to control as much of the battlefield as you can. The game duration is 6 turns.
Nota for Confrontation players: we may have made many many mistakes during this game. I played Confrontation v.2 back in the days and only switched to v.3 last year when I started to play again. Since then we only play three or four games, so you should not consider me an expert. Still, when games are fun, I consider rules mistakes not to be a serious issue.
The battlefield is divided in 3 zones (Confrontation standard setting – Battle Lines): two deployment zones separated by a neutral area (delimited by the small black dices lines you can see on the pictures). Each zone you control at the end of turn 6 grants you victory points (your deployment zone is worth less than the neutral area which is worth less than the ennemy deployment zone). To control an area at the end of the game you have to have more guys in it and their point value has to be higher than your opponent’s (you take wounds into account, but I won’t bother you with this).
Battlefield
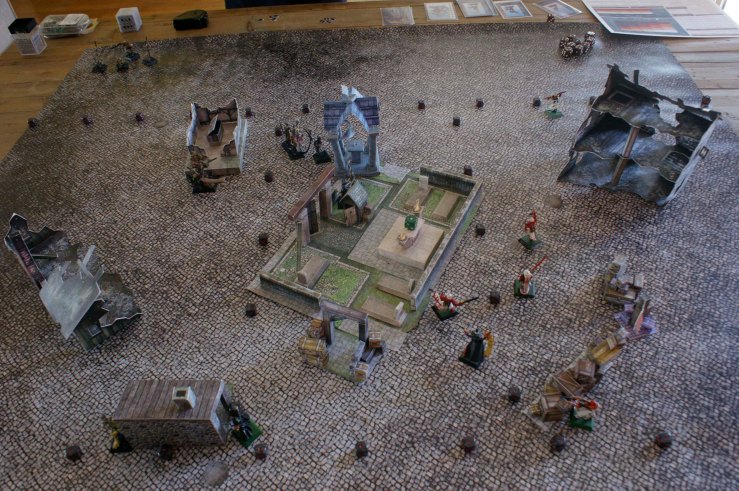
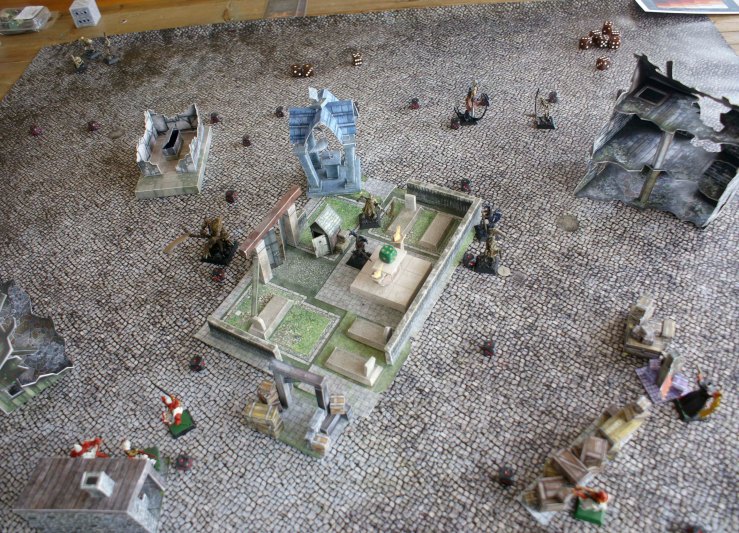
As usual I relied on papercraft scenery (do you want to know more?) and my cobblestone gaming map (bought for Mordheim) for the table. I went for a not so crowded table, triing to balance both deployment zones in terms of covers with a quite « open » neutral area in the middle (the main piece here is the cemetery).


Let’s say the cemetery portal is facing north, so we can use this to make things a little bit easier to follow.
The armies
It is a 200 points [PA] game (medium size in Confrontation) opposing the undeads from the corrupted Barony of Acheron (do you want to know more?) to the righteous, eventhough not that tolerant, soldiers of the Akkylannian Empire. As it is a friendly game, I allow +/- 5% of « creativity margin » when constituting the lists.
Nota for Confrontation players: we used v.3 rules, ie spells cost PA when building lists but I decided to switch to v.3.5 for our next game.
Acheron Barony (my friend, « Pigeon du Canal »): Azaël (Necromanceress) with two spells (one to summon skelettons and one to make them explode when they engage a foe) [57PA] ; 1 banshee (their role is basically to scare people off) [27PA] ; 2 Irae Tenebrae (dark magical beings, fast and close combat oriented) [36PA] ; 2 zombies (rotten corpse armed with scythe, funny thing: they heal from their wounds) [38PA] ; 1 zombie Wolfen (the big guy of the group, he also heals from his wounds) [51PA].
209PA, 8 warriors, all dedicated to close combat.
Akkylannian Empire (me, « Le Verménarque »): Inquisitor (warrior-mage who can throw quite a punch) with one spell (something to enchant his sword to punch even harder) [40PA] ; 2 riflemen [38PA] ; 2 templars (to escort the lord Inquisitor) [44PA] ; 1 witch hunter (many bonuses against users of the dark arts) with two spells (one to heal the Inquisitor, one two hurt the Necromanceress) [52PA] ; 1 thallion (my favorite guys, they are basically good at everything and can deploy behind ennemy lines) [28PA].
202PA, 7 warriors, subtle as a magical hammer.
Deployment
Acheron won the first tactical roll (should’nt happen…) and so deployment begun. I got the southern deployment area and Pigeon the northern one.


Here you have what the battlefield looked like with a strong undeads center, the zombie Wolfen in second line, ready to jump wherever he would be needed (and the banshee alone on the right flank – not on the pics).
On the Akkylannian side you have a thinner battleline (which you can’t fully see here) covered by the riflemen cross fire (right and left flank). You’ll notice my sneaky thallion, hidden in ennemy territory (as he is a scout, as long as he doesn’t do anything and no ennemy is within 10cm range, he cannot be targetted by any foe).
Turn1 – Let me see your face
Activation phase (movement, mystical arts and shooting)
Turn1 was pretty quick and straightforward as both armies advanced toward each other. Pigeon started to pivot his troops to flank me on my right, as I pivoted mine to flank him on his right. The banshee decided to close in on my thallion, thus exposing him.


« First blood » goes to my most decorated rifleman, Zorba, who wounded a zombie despite him being in cover (the only rotting corpse he was seeing at that point).
End phase
Azaël did not manage to summon the dark energies of tenebrae and did not collect any magical gems (the stuff you need to cast spells), which meant I had one more turn before being overrun by skellies… My two spellcasters did better, meaning I was hopping to purge the undeads with holy fire very soon.
Turn2 – The duel
Activation phase (movement, mystical arts and shooting)
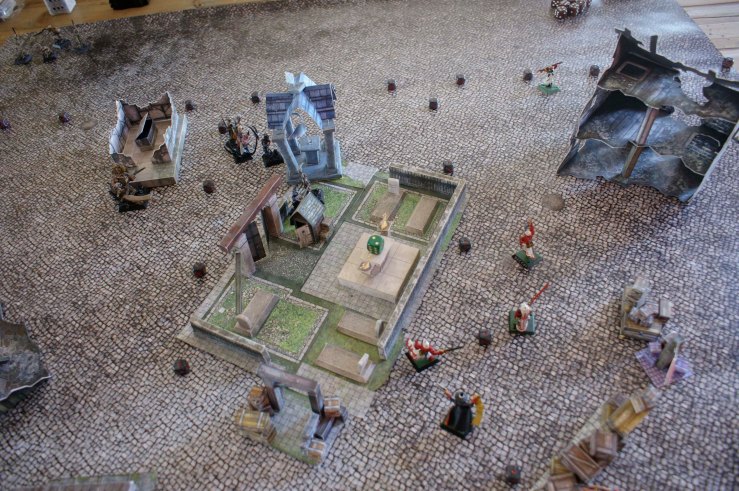
Turn2 allowed us to approach the cemetery. Pigeon splitted his main battle group, with rotten corpses enterring the cemetery from the north-east as Azaël continued to advance towards my right flank (ie Zorba -see upper right corner of the pic-).
I constituted a battle group with my two templars and my Inquisitor, supported at that point by my witch hunter. My plan was to move them near the frontier between the neutral area and the enemy deployment zone, thus being able claim any of the two areas. I was confident that my thallion (outside of the pic) could deal with the banshee, if all went according to plan my left flank would gain in mobility, thus opening new tactical options.


As the banshee had exposed my thallion I decided it was time for me to engage her. I was confident in the outcome: thallions are powerful warriors and banshees are not. Banshees have one strengh though, they are very (very) frightening and despite the high bravery of the thallion I failed my bravery roll and could not engage. The banshee then decided to engage the thallion. I rolled again for bravery and failed again… Since the thallion was already « active » he held his ground, but suffered penalties from fear. Things were not going according to plan…
Close combat phase

All warriors being active, we started the first close combat round of the game.
My thallion won the initiative roll and hit the banshee (with only one attack dice, being affected by fear). I rolled to hit, the banshee failled to defend and I got a crirical wound. Things were starting to look bright again. As thallions are quite resilient (like most Akkylannian warriors) I was betting on the fact that the banshee could not harm me and that I would sent her back to her grave during the next round.
She hit me and I failled my defense roll. Not too good, but with her strengh and my toughness, chances were she would inflict minimal wounds. Pigeon prayed the dark gods, the dices hit the table, rolled to wound…DOUBLE 6s!!! Instant death…
Things were going as bad as they could…
Turn3 – Redeployment
Activation phase (movement, mystical arts and shooting)
At that point my troops were at the south-west corner of the cemetery as Acheron was consolidating on the east side of it. Azaël was marching toward Zorba (far east of the battlefield), bravely hidden behind a zombie.


As my plan to use the thallion as an undercover pain in the ass in enemy territory had gone sour I had to dispatch my inquisitorial combat group to take care of the banshee. I did not want her behind my lines. This delayed my main plan but did not contradict with it too much since I still could position my templars and Inquisitor on the frontier between the neutral area and Acheron deployment zone.
My brave soldiers all rolled good bravery tests and charged the banshee, quite the overkill, but you can never be too careful.
At that point I made what I consider my gravest mistake during this battle, which was hesitating on what to do with my witch hunter. Azaël was on the east side of the battlefield. My witch hunter (who was on the west side) should have rushed there (witch hunters are, as you can guess, on the battlefield to kill witches…), but one ira tenebra and one zombie were slowly closing the road to Azaël. Had I ran to the east side of the battlefield, I may have been able to threaten Azaël, but I feared it was already too late and did not move toward the witch as fast as I could have… More on that later.
One the right, Azaël closed in on her prey (my best shooter) and summoned a skeletton to protect her and kill my sharpshooter.
Close combat phase
Close combat phase was quick and effective as I killed the banshee and was once again able to move freely on my left flank.
Turn4 – Time to clean the cemetery
Activation phase (movement, mystical arts and shooting)
During the fourth turn we closed in to fight. Pigeon used his Irae (the little purple guys on the picture) as the spear of his assault: the one in the cemetery (near the turn counting green dice one the picture) marched towards my inquisitorial battle group and the one on the southern side of the cemetery advanced towards my with hunter (and closed the road I could have used to attack Azaël). Acheron forces were enterring my deployment zone.
I responded to these moves in kind, sending my inquisitorial battle group in the cemetery, charging the ira (in the north west corner of the cemetery).


I landed some lucky shots during that phase. Zorba killed the first skellie (and Azaël summoned a new one…). One the other side of the battlefield my witch hunter critically wounded the advancing ira.
Close combat phase
In the cemetery my templars and my inqusitor killed the ira. It should have been easy as I had the numbers and used some nice special rules to strike numerous attacks. My wound rolls were pretty bad though and that thing nearly survived. Still, because of sheer numbers, I killed it.
At that point I considered consolidating (free move once you killed a foe) towards the zombie wolfen. I decided against it, since only one of my templar was in range and I feared the zombie wolfen would tear him down (allowing him a consolidating move towards my then disorganized battle group).


End phase
From that turn on, the zombie wounded during turn 1 (who was closing in on my witch hunter) started to heal from his wounds each turn. Azaël also got more and more lucky in her mastering of the dark arts, allowing her to amass a large reserve of tenebra gems thus being free to use her dark magic as she wanted.
Turn5 – Grand Finale?

Activation phase (movement, mystical arts and shooting)
I hoped I could charge the zombie wolfen, but Pigeon won the tactical roll and played the big guy first. He obviously charged me… Luckily for me he could only reach my inquisitor (yeah, that big base does not easily fit in small crowded space), so I had an opportunity to counter charge with both my templars. They only had to roll good bravery rolls…which they did not!
In my deployment zone Azaël and her skellie charged Zorba the rifleman and the wounded ira and zombie charged my whitch hunter. This was not looking good…


Close combat phase
Pigeon did not want to take any chance with Zorba, so after some wounds were inflicted, Azaël casted a spell to blow up the skellie in Zorba’s face, killing both in the process. At that point Pigeon held my deployment zone (he had three minis in it and I had only two…).
The witch hunter was next. He had to fight to opponent. To contest the zone I had to kill one foe and survive. As I rolled a nice initiative roll I got the opportunity to strike first the critically wounded the ira. I did not inflict any damage. If the witch hunter could only survive… He did not, beheaded by the scythe wielding zombie. Pigeon was holding his ground. Only one of my riflemen remained in my deployment zone…
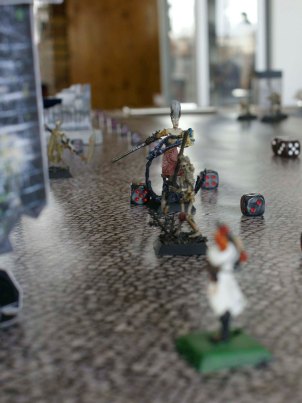
In the neutral zone my Inquisitor only wounded the zombie wolfen, despite the spell I had casted on his sword (hoping to set the beast ablaze). The zombie wolfen was unable to kill the Inquisitor. He landed his attacks but the Inquisitor’s armour allowed him to survive the furious blows.
End phase
Not much now. The zombie who had killed my whitch hunter continued healing and all the spell casters replenished the magical reserve.
Turn6 – Everything is (still) possible

Activation phase (movement, mystical arts and shooting)
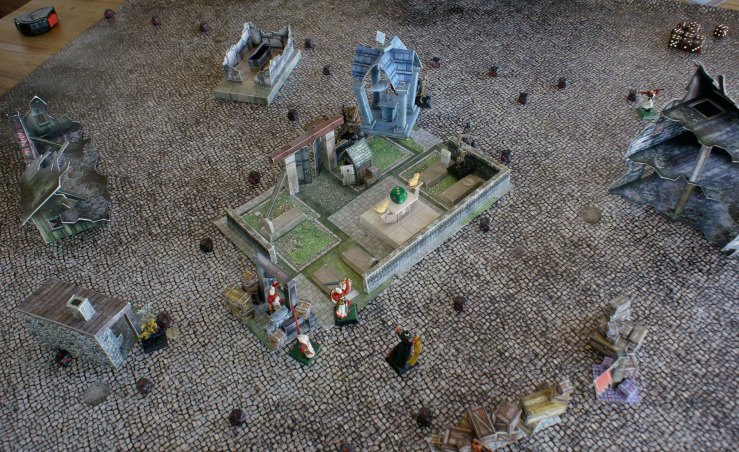
Last turn, last shot, last kill. My remaining rifleman shot the ira dead before the zombie charged him (see in the down right corner of the pic above, after the charge).
I wanted my templars to charge the zombie wolfen and help my inquisitor. If I could kill the beast then I’ll control the neutral area and get a free consolidation move to send one templar occupy the ennemy deployment zone, thus securing a clear victory. I rolled for bravery before the first charge and…failed. My first templar could not move.
At that point I decided the second templar would not help the inquisitor but move into the ennemy deployment zone to take hold of it. Victory would be decided by my Inquisitor…
At that point in the game (see picture above) everything was still possible:
- on the northern front (my deployment zone) my rifleman could still kill the zombie. It was unlikely but it could happen, and if it did, Acheron would not be able to claim control of the zone;
- on the southern front I had a lonely templar controlling the ennemy deployment zone, this was safe…unless the zombie wolfen killed all my men and was able to consolidate inside his deployment zone to contest it (unlikely as well, but possible);
- the most likely issue was that Acheron forces would control my deployment zone and I would control theirs. It all came down to the duel between inquisitor Bertrand and the undead wherewolf in the cemetery… Pigeon and I held our breaths.
Close combat phase
Let’s not talk about the fight between my rifleman and the zombie on the northern front. They both attacked, they both missed… I suspect they passed a deal to both survive the battle by not being overly agressive in what they knew to be the last turn of the game.
As we placed our dices (in Confrontation you have a number of dices you have to attribute to attack or defense) the last choices of the game were made. Pigeon launched an all out attack, as his only chance of victory was killing the Inquisitor, no matter the cost. I hesitated. I could play safe and place all my dices in defense, thus making almost sure Pigeon wouldn’t win. That would mean I couldn’t win either since I could not kill the zombie wolfen. I prayed Mérin and chose a bolder path, keeping one defense dice and one attack dice.
We both rolled pretty good rolls, we both landed vicious attacks and wounded each other, but none of us killed his foe…

Victory
In the end, the game was tied. My lonely templar controlled Acheron deployment zone on one side, Azaël and one zombie controlled mine on the other side (my rifleman was not enough to contest that area). I the neutral area, where the battle was (un)decided, nobody could claim victory as we both had two fighters still standing (a templar and the Inquisitor on my side, the zombie wolfen and the forgotten zombie on Pigeon’s side).
Azaël released her last minion from her magical grip and the zombie collapsed on the ground, nothing but a rotten corpse now that her will was not supporting it. She seathed her sword and drew her hood on her face. She was forced to leave the battlefield for now, neither beaten nor victorious. She had to go back into hidding, as the blind followers of Mérin’s false teachings were back in their monastry, licking their wounds. What mattered was that they had not discovered what was hidden in the cemetery. Knowledge was power and she had more than any of the follower of the Light.
« Let them think nobody won the day, tomorrow their dead heroes will be mine… »
The sun sets on the battlefiel…
In the end it was a very balanced game which could have gone any way till the last roll of the last turn. The kind of epic game I like.
Bravery…or the lack of it!
One of the main challenge when facing Acheron is to keep to your plan, as all of ennemy troops cause fear. In the past I tended to discard this, considering Acheron strengh was its mighty wizards and numerous hordes but laughing at the idea of being frightened by them. My soldiers have good bravery ratings and a special rule (fanatic) helping them hold their ground in the worst situations.
I would not treat this so casually from now on. Fear was the reason I couldn’t engage the banshee at the beginning of the battle, maybe leading to my thallion death. A death that deprived me of an easy way to occupy the ennemy deployment zone from the very beginning of the battle.
It was also fear that prevented me from charging the zombie wolfen with all my strengh, thus giving my opponent a tactical freedom I had not.
The forgotten zombie

I made some mistakes, Pigeon made some too (luckily for me). This guy, with his lantern and his scythe, could have charged my inquisitor in the last turns of the game. Eventhough he is no mighty warrior, his support could have made a difference in the last duel of the game. Had my inquisitor fell before the combined wrath of the zombie wolfen and the forgotten zombie, Acheron could have secured the neutral area and victory. In the end, Pigeon simply forgot about this particular zombie, who suddenly stopped during turn 4 and just watched friends and foes kill each other while counting the flies buzzing around him.
The witch hunter who never found the witch
I know it, you know it, everybody knows it: hesitating on the battlefield is the first nail in your coffin. At first I wanted my Inquisitor and witch hunter to work together. As it became clear that Azaël would work alone on my right flank and I needed my Inquisitor to lead the combat group I was sending to counter Acheron main forces in the center, my witch hunter should have ran to my right flank.
He could have, but I hesitated one turn too long (see above) and the moment was gone. My foe put an ira and a zombie between the witch hunter and his prey, thus effectively protecting Azaël from the guy that could hurt her the most. He did a nice move and my indecisiveness may well have costed me victory.
Well that’s all for folks. Hope you liked what you read, see you soon.
Banner picture found on the interweb, other pictures were taken by me during the battle.

[…] at my place. These games were the opportunity to write my first battle reports. You will find them here and there. We now are a group of 3 to 4 players and I am considering to run a campaign in 2019 […]
J’aimeJ’aime
[…] finished editing my first ever battle report on the eve of a Confrontation game, with many ideas on how to improve it. During the battle I was […]
J’aimeJ’aime
Great battle report. I’m not familiar with Confrontation but I’ve heard many good things about it. For a supposedly ‘dead’ game’ it is doing quite well in current blogging with https://toomini.wordpress.com also posting battle reports at the moment. Keep sharing them please!
J’aimeJ’aime
Thanks very much for your kind words! It is a great game.
And thanks for the tip about the blog, I am always looking for more Confrontation content.
J’aimeJ’aime
Great work here – especially for a first write-up (and in English, too!) It really makes me think I should try and do more of these myself. Oh, and the game looks great and like it was a lot of fun!
J’aimeJ’aime
Thank you very much! As I see many things to improve (and we’ll try to do better with my next game – taking place today -) I still wanted to post this one as the battle was so much fun.
Thanks again for the kind word.
J’aimeJ’aime