

Pigeon du Canal and I had decided to meet for a friendly game of Confrontation on a Saturday morning. When he arrived at my place he asked for a revenge (see here) and we decided to play the same scenario as last time, using the same lists. Here is how it went…
Kayl was meditating when he felt a presence at the fringe of his consciousness. With tremendous efforts he focused on the intruder. The presence was there, but faint and evasive. He almost did not catch her…almost…
Opening his eyes the technomancian smiled, she was back to take her revenge. « Well, let her try », he thought.
Game / Scenario
Game: Confrontation v.3.5 (see here for my opinion on the rules).
Scenario: same as last time we played « execution » (p.125 of the French edition of the Confrontation v.3 rulebook). The objective is for each player to kill the mini with the highest points value [PA] in the ennemy army. If neither or both players succeed, the game is tied.
Nota for Confrontation players: we may have made mistakes during this game. I played Confrontation v.2 back in the days and only switched to v.3 last year and v.3.5 for this game. Still, when games are fun and played in a friendly environment, I consider rules honest mistakes not a serious issue.
Battlefield
Confrontation standard setting – Battle Lines.
As you can see there is quite a « killing zone » in the middle of the table, with buildings surrounding it. This was not intentional but had some interesting effects on the battle, as Pigeon and I tried to avoid the center of the table (he was worried of my shooters and I was worried of being assaulted by his « big guys ») and used the two « corridors » on the sides of the table (east of the ruined mausoleum and west of the ruined tower) to move and fight.
The armies
It is a 200 points [PA] game (pretty standard in Confrontation) opposing Acheron (undeads) to Dirz (heretical cloners). As it is a friendly game, I allow +/- 5% of « creativity margin » when constituting the lists.
As I mentionned before, we used the exact same lists as last time, since the idea was to « refaire le match » as we say in French, so you get the same pics as last time since I did not take new ones (lazy me)…
Acheron Barony (my friend, « Pigeon du Canal »)
Azaël used her usual spells: one to summon skellies and one to make them blow up once engaged. Zombies used a special option to get a change to stay in game as « dislocated zombies » (basically fighting dismembered bodies) once dead [Nota: home ruled that one to reduce its points cost].
As the most expensive soldier, « Jean-Claude » (the zombie wolfen) was my target.
200 PA, 8 warriors, a very versatile army.
Dirz Empire (me, « Le Verménarque »)
Kayl Kartan is an impressive wizard and using v.3.5 of the rules, he could learn a LOT of spells. Before the battle he learned how to cast fireballs (very useful), how to heal his soliders after they injected mutagen into their veins, how to enchant weapons so that they would deal more damage. He also had a spell to increase wounds penalties on his foes (but I forgot about it during the whole game…). I also gave him the « skull of souls », a magical artifact which allows Kayl Kartan to use the dark arts to make his ennemies do his bidding. I took it for fun, but it was well worth the 17PA!
As the most expensive soldier, Kayl Kartan was Pigeon’s target.
203 PA, 7 warriors, strongly relying on Kayl’s himself.
One thing you should know about the Dirz army (or else the game won’t make much sense) is that they are allowed to inject themselves with mutagen during the game. You get a number of dice to give your soldiers each turn (you’ll notice big green dice next to my troops on the pics), then you can roll these dice and get bonuses you can use to boost some caracteristics at a convenient time (untill the end of the turn). This is pretty random but, when the dice Gods are with you, it is a GREAT bonus since it is very flexible.
Deployment
Once again Acheron won the tactical roll and Pigeon chose to deploy on the north side of the battlefield (sounds familiar doesn’t it?).
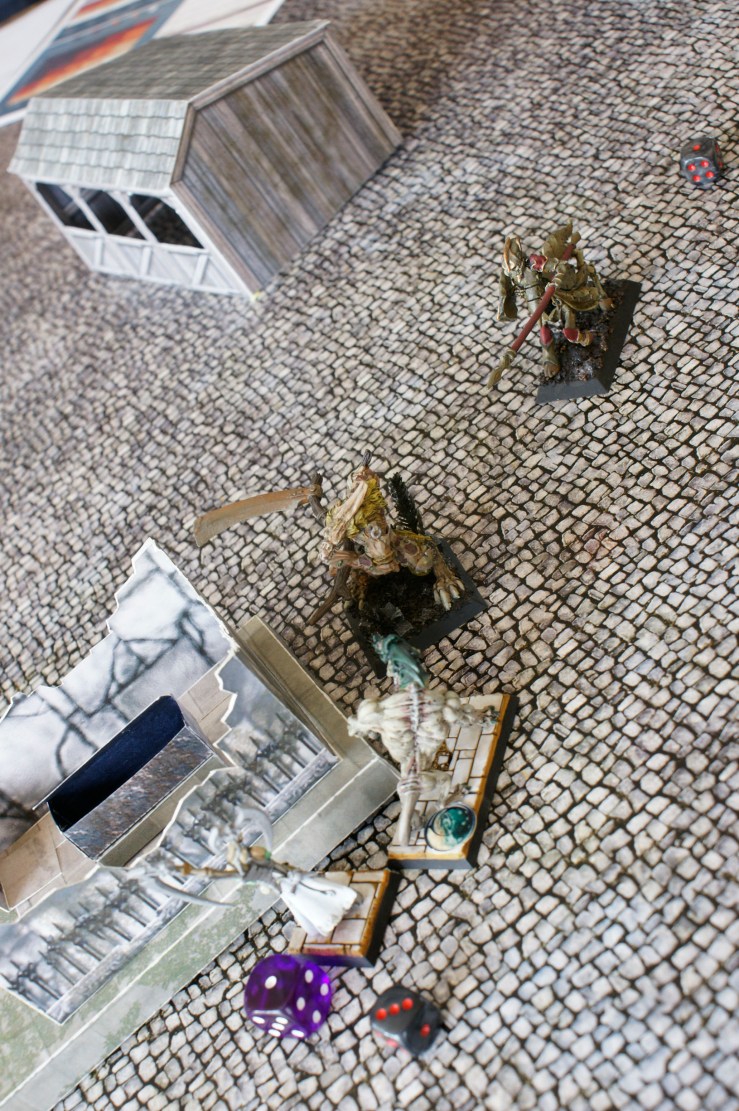
Pigeon thought one of the « mistakes » he made during our last game was his initial force organization, so he tried something new this time. Here you can see a very strong right flank with zombies and a skelly forming a protective line in front of Azaël (who is able to summon even more skellies during the game) with a centaur as « spear head » of the group (this kind of centaurs are scouts, so they can deploy outside of your zone). The heavy centaur is courageaously hidden behind a stack of crates and Jean-Claude is alone on the left flank, hidden as well.
I started to deploy in a way very close to how I did last time, with a line of close combat clones (two), but as I realized Pigeon was strenghtening his right flank, I did the same with mine, leaving my left flank « exposed » to his main force (with only a close combat clone and a crossbowman) and using the graveyard as a kind of stronghold. You can see that I deployed Kayl, two crossbowmen and a clone in the graveyard. I added my tiger to this combat group (which was almost my whole army), deploying it outside of my zone (it is a scout as well). I knew Pigeon’s right flank was very slow (skellies do not walk very fast) and that as long as I did not move frome the graveyard they could not reach me in time to inflict any real damage. My left flank only job was to taunt the skellies (and Azaël) and make sure they did not turn their attention to the graveyard. I did not care if they died as long as it was not too soon during the game.
Turn1 – Hidden in the Graveyard
Activation phase (movement, mystical arts and shooting)
Not much happened during turn 1. We were still triing to guess was the other was up to I guess. Pigeon started to use is scout centaur to harass my left flank (this guy is able to move out of cover, shoot and then fall back to cover in one turn, which is fun for Pigeon and tiring for me) and wounded my crossbowman. The skellies and Azaël moved forward and one of my crossbowmen move toward the center of my line to get a line of sight one Pigeon’s right flank. The heavy centaur move toward Jean-Claude, and that was it.
End phase
We both did well and got all the magical gems we needed.
Turn2 – Let’s take this slow…
Activation phase (movement, mystical arts and shooting)
The second turn was pretty much of the same than turn 1. The crossbowmen and the centaur were engaged in a shooting duel on the western front. My wounded crossbowman survived because the centaur was unable to wound him again but failled to inflict any damage. His buddy (the one you see walking alone in the center of the battlefield on the pic) proved to be more efficient and wounded the skelly hidding behind the tower (quite the impossible shot, I was pretty proud of that one).
Pigeon’s troops were still advancing on my left flank, which was fine by me and Azaël started to summon more skellies, which was not really good news.
On the eastern front nobody was really moving, none of us wanting to be in charge range of the other… It seems the trench war was going to last.
End phase
Nothing fun there…
Turn3 – First kill
Activation phase (movement, mystical arts and shooting)
On the western front the shooting duel continued but as the deads horde was closing on me I succeeded to kill a zombie. I also finished the wounded skelly…which was immediately replaced by a new one summoned by Azaël. These things tend to rise from the ground faster than you can put them back there…
Since one zombie was down and his buddy was a bit closer to me than the skellies, I sent my clone to try kill him in close combat, hoping to slow down the tide a bit more.
On the eastern front we were staring at each other and I started to wonder if my plan was going to work or if I should take more risks. You have to bear in my that in the « Execution » scenario you have 5 turns to kill the ennemy’s « big guy » so time is a key factor.


Close combat phase

I used my mutagen points (I got 4, which is a lot) to boost my close combat clone, I really hoped to kill the zombie in one turn. It served no strategic purpose in itself but you know, I like to kill my opponent’s guys… On top of that zombies can regenerate, so killing them in one stroke is always better.
Mutagen is a great tactical asset. It is very flexible and opens a lot of opportunity. The clones are rank not impressive warriors but with a good mutagen roll they can become quite the versatile fighter.
The combat went very well for me (thanks to mutagen and Pigeon’s lack of luck) but I did not kill my opponent.
End phase
Azaël got a full stack of gems, meaning she could replace any skelly I would kill or make them blow in my face.
Turn4 – Time to fight?
Activation phase (movement, mystical arts and shooting)
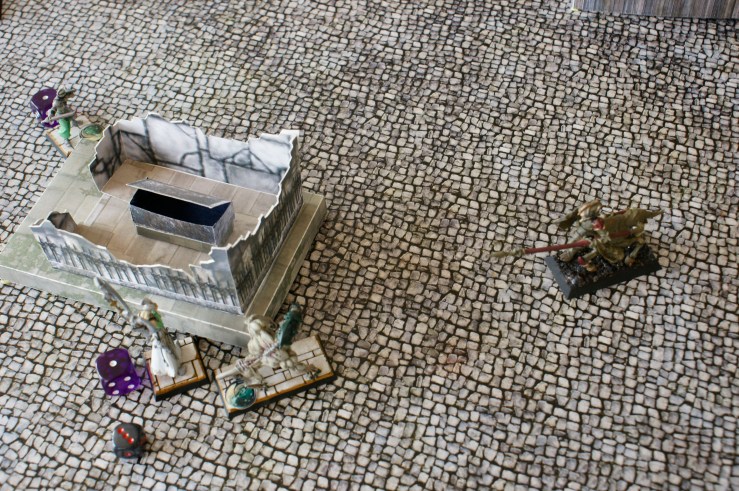
Now the undeads were on me and our armies clashed on the western front. Pigeon charged pretty much any guy he could see and even sent his centaur in my backyard. That part of my plan was a success, this was turn 4 and no matter how the fights were going, it meant Azaël and her combat group were to far away to pose any threat to Kayl in the last turn.
We both realized that it was time for us to stop staring at each other and started moving on the eastern front. Jean-Claude and the heavy centaur went out of hidding and advanced toward my line just as Kayl and his pet tiger positionned themselves behind the ruined mausoleum. My second clone also moved forward, on the western side of the mausoleum.
Close combat phase
Our fighters were…inefficient (to say the least). Pigeon killed my wounded crossbowman but appart from that I think we rolled more ones than decency allows…
End phase
Kayl was ready…
Turn5 – Let’s dance…
Activation phase (movement, mystical arts and shooting)
The trap was set, now was the time to see if it would work. That the strategic roll (first roll of a turn, determining who gets to activate its fighters first) was obviously key. We both knew that the first player to activate his troops would get the opportunity to charge first, thus breaking the eastern front stand off.
What Pigeon did not know was that I did not want to charge first… Had I done so, I would have had to charge with the tiger first. If I charged Jean-Claude then the centaur would have been able to either charge Kayl (who can defend himself in close combat but not necessarily against a heavy centaur charging…) or add his strengh to Jean-Claude’s denying me the opportunity to kill him with the tiger. On top of that, once Jean-Claude was locked in combat with the tiger I would lose the opportunity to blow his dirty face with a fire ball (which I like to do).
That scenario was not to my likings. I had chosen another path, hopping Kayl mastery of the Dark Arts would make the difference.
Pigeon won the strategic roll and activated the heavy centaur which immediately charged the tiger (the « wild horde » theme music form « My name is nobody » was playing in the background). Pigeon had all the reasons to be happy. He could kill the tiger and then consolidate on Kayl. I had the tiger card in my hand and…kept it in « reserve », thus choosing to activate it later. Why would you ask, since it was locked in close combat and hence unable to do anything during its activation phase? Wait for it…

Pigeon then activated Jean-Claude. Because of the way I had positionned my tiger (in the « corridor » along the mausoleum remember) Jean-Claude was unable to charge my tiger. He still moved forward, offering moral support to the heavy centaur. This was good news.
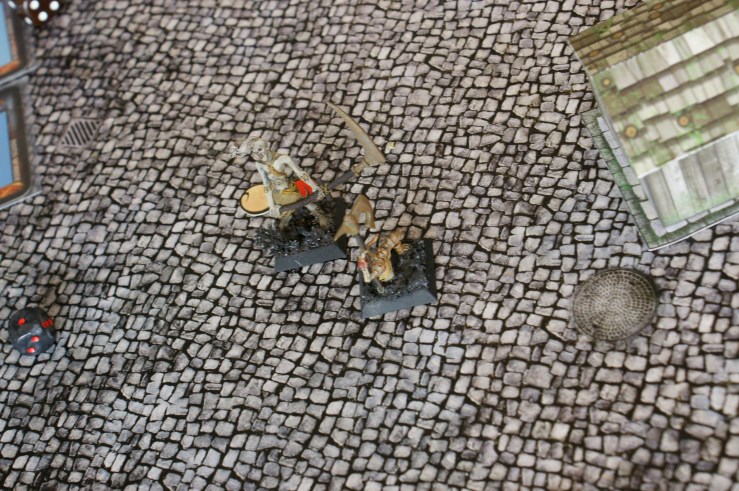
I then activated Kayl, now was the time. Pigeon was already picking up his next card (Kayl could do nothing, trapped as he was behind the tiger), but Kayl started to slowly brush the obsidian skull he carries around with him (silly habit isn’t it?) and muttered words of power. After a short incantation he looked the heavy centaur in the eyes and said, in a commanding tone: « Go away »… And the heavy centaur did as it was told…
Yes, Kayl has more than one trick up his sleeve and once a turn ha can use the power of the skull to force his will on weaker minded foes.
Now Pigeon knew why I had kept the tiger in reserve, the big cat was now free to charge Jean-Claude, but I was not eager to do so before weakening him a bit.
Kayl turned his gaze to the big rotting wolf. I used all my gems to release a torrent of fire on the beast. I took no chance, rolling as many dice as I could and boosting the spell as much as I could. Wolfens, dead or alive, are tough to kill. The fire engulfed Jean-Claude. He did not really hope to kill him, I wanted to wound him badly and get the killing blow with the tiger but the Dark Gods were with me.
When the magical fire started to fade out Jean-Claude was a smoking pile of ashes… Victory was mine.
I think this was a low point in our friendship. In a couple of minutes and rolls sweet victory had slipped from Pigeon’s fingers and ha had felt the cold embrace of defeat…
I am joking of course, Pigeon and I would not fight over a good fight. Still, he was pretty pissed and I was pretty happy.
The tiger was now free to charge the heavy centaur (and it did). On the western front Azaël blew a skelly in my face out of rage, killing my crossbowman in the process and the other undeads charged the last of my clone standing on this side of the table.
Close combat phase
We played the last combat phase for sports. Pigeon had nobocy who could do Kayl any harm and Jean-Claude was dead, so the battle was done. Still, some more blood on the field is always nice.
On the western I first thought I had killed the last zombie (that’s why you can’t see the zombie on the pics above, but he is there, locked in combat with my clone, behind that small house) and my clone would survive but we realized we got mixed up in the wound penalties and started over. My clone died, crushed by the zombie and his skelly friend.

On the eastern front my tiger did very well. The heavy centaur was denied his charge (hence his bonuses) and my tiger got his. The fight was quick and bloody but in the end, the heavy centaur died without having inflicted any damage. It was its fifth battle in a row with appaling result. It will now be known as « the cursed centaur ».
Victory
This time the game was done a little bit earlier than usual, still all was resolved in the last turn. Victory was mine one more time, but it was still not the last act of that play (do you want to know more?)…
Azaël saw the last clone collapse, striken down by one of her minion. Kayl’s pityfull warband seemed to be in full retreat, but her foe was nowhere to be seen. She then felt a heat wave like a thousand suns burning… Before she could do anything she realized the magic bond linking her to her mightiest warrior was gone, the wolfen she had painfully brought back to life was dead once again, consumed by elemental powers and lost in the void for good.
She bit her lip. Yes, the technomancian’s warband was in full retreat, but she was nowhere near to claiming victory. Kayl Kartan lived and she pictured him smilling in her mind.
« We’ll meet again old fool », she whispered, regrouping her last minions, « and this time, I won’t be alone… »
The sun sets on the battlefiel…
My plan had worked very well and with a drop of luck it looked like a one way battle. To be honest it kind of was. Since turn 3 Pigeon only road to victory was me making a mistake (and I did not) or me being tremendously unlucky and him being very lucky at the same time (I could have failled the « go away » spell and my fire ball and the centaur could have killed both the tiger and Kayl in one turn, but this was unlikely).
The game could have been a tied, had I not succeeded in killing Jean-Claude. That was very close. For example the stinky wolf could have stayed behind when the centaur charged and that would have deny me any chance of victory. I guess this mistake left a sour taste in Pigeon’s mouth, maybe he’ll you how he feels about this.
On the other hand Pigeon’s army did very well on the western front. I was unable to stop Azaël and her minions. This had no consequence because of the scenario, but it meant that the undeads horde were not overwhelmed. Playing Kayl as I do (the more expensive profile with his artifact) means he is very expensive. He did his job once more, making him a very profitable investment, but the rest of the army is pretty unimpressive (except from the tiger) which means that when Kayl is not there, my clones tend to die rather quickly…
A last thought on this game, it had a very slow beginning. We spent quite some time watching each other without doing much. I felt longer than it was, but two turns in a five turns game is a long time. Now that I think about it, I think this also helped me. My shooters were able to fire more shots at the ennemy and I did not have to move my line very much. I also had much time to gather magical gems and set my trap. That is one mistake Pigeon won’t make again I guess…
Well that’s all for folks. Hope you liked what you read, see you soon.
Banner picture found on the interweb, other pictures were taken by me during the battle.

[…] the dust settled on the battlefield of our first game of the day (see here) one could say that Pigeon was not happy with himself. We wanted to play one more game since the […]
J’aimeJ’aime